
In part 1 of this blog post I got SolrCloud up running with both TLOG and PULL replica types. In this second part, the goal is to wire Sitecore up to work with Solr 7 Cloud, and finally perform a couple of tests that verifies that the setup works.
Finally, some considerations on using this setup for high-performance websites on Sitecore and SolrCloud.
STEP 7: SET UP THE SITECORE CM INSTANCE
Getting Sitecore wired to Solr normally is easy, lots of good blogs and guides on that – a few of these:
https://doc.sitecore.net
https://sitecore-community.github.io
But this time something changed!
As part of the Solr 7 release – Solr default response type changed from XML to JSON (https://issues.apache.org/jira/browse/SOLR-10494). Sitecore’s wiring doesn’t take that into account. So, after wiring is set up, you can’t even get Sitecore up running. You simply get a message like this:
Server Error in ‘/’ Application.
Data at the root level is invalid. Line 1, position 1.
Description: An unhandled exception occurred during the execution of the current web request. Please review the stack trace for more information about the error and where it originated in the code.
Exception Details: System.Xml.XmlException: Data at the root level is invalid. Line 1, position 1.
A FAST SOLUTION TO THIS ERROR
The above error pretty much tells us that it wasn’t really the XML response that the Sitecore code expected. I ended up hacking this a bit on the Sitecore site:
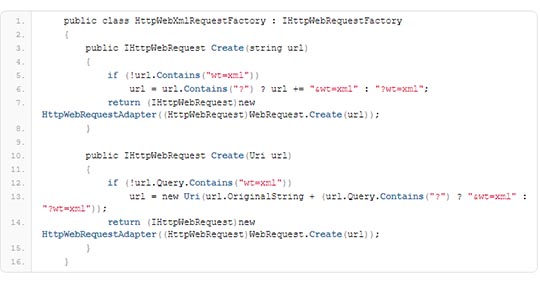
Patch the setting:
<solrHttpWebRequestFactory
type="HttpWebAdapters.Http
WebRequestFactory, SolrNet" />
defined in the file: ContentSearch.Solr.Default
IndexConfiguration.config with your own class. Something like this:
<solrHttpWebRequestFactory type="Blog.Solr7.SolrNet.
HttpWebAdapters.
HttpWebXmlRequestFactory,
Blog.Solr7" />
This simply adds the wt=xml to all request so that Solr respond with XML and not the default JSON.
This got me up running with the Sitecore CM instance. I had to go through a couple of rounds with getting all the needed dynamic fields definitions in Solr, before I ended up with having it running as expected.
STEP 8: SET UP THE SITECORE CD INSTANCE
I wired up a CD instance, also on my local machine – followed the same usual instructions. Only this time I wanted Sitecore to point to my PULL nodes instead. So for doing a small simple fast Load Balancer locally I used NGINX. Extremely easy and fast to setup.
I got NGINX binding to port 81 on localhost – doing round robin between my two Solr PULL nodes on port 9004 and 9005. And from my Sitecore “CD instance” I set it to point at my NGINX on port 81:
<setting name="ContentSearch.Solr.Service
BaseAddress" value="http://localhost:81/solr" />
I activated the SwitchMasterToWeb.config and removed references to syncMaster following the normal procedure.
Finally I had it all up running:
- Sitecore CM instance
- Sitecore CD instance
- ZooKeeper Ensemble
- SolrCloud with 3 nodes having all the TLOG replicas and 2 nodes having the PULL replicas
- NGINX server doing Load Balancing between the CD instance and the 2 nodes having the PULL replicas.
STEP 9: QUERY ONLY LOCAL! AND USE LB
One thing is missing though; As mentioned in part 1 of this blog, queries to SolrCloud will be handled by SolrCloud and not by any specific Solr Node per default. That’s sort of they idea with SolrCloud. But in this case, we want to query specific nodes only, since these nodes only serve queries and don’t spend time on indexing. Secondly, querying a specific nodes, will be faster that querying the cluster since forwarding the query is not needed (“faster” if the node we query is not overloaded…).
I choose to go with the simple solution and add the preferLocalShards parameter to the default select request handler that Sitecore used:
<requestHandler name="/select" class="solr.SearchHandler">
<lst name="defaults">
<str name="echoParams">explicit</str>
<int name="rows">10</int>
<bool name="preferLocalShards">true</bool>
</lst>
...
STEP 10: TESTS AND VERIFICATIONS
Last and most important step is to verify that the setup works as expected. I did that simple and low-level techniques such looking a log file entries, closing/starting services and tailing log files.
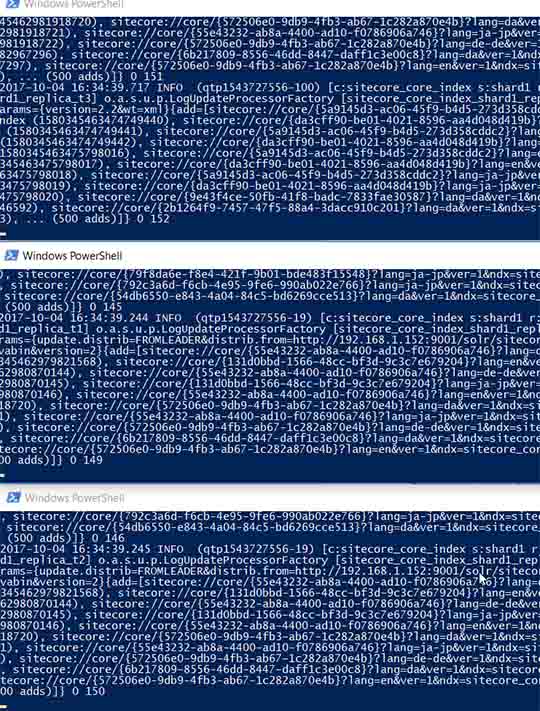
QUESTION: Which nodes get hit while indexing?
I indexed the core index in Sitecore and looked at all the log files from the 5 nodes at the same time.
HINT: I used PowerShell to “tail” the solr log files. Really easy to use, and what’s always been missing on windows:
Get-Content D:\solr-7.0.0\sitecore82\node1\logs\solr.log –Wait | where {$_ -match "sitecore_core_index"}
As expected node 1, 2 and 3 got all the /update requests from Sitecore CM – while node 4 and 5 didn’t.
You simply see all the /update being distributed to all the indexing nodes:
On the PULL replica nodes it registers that the index is out of sync with the master/leader and starts requesting index files:
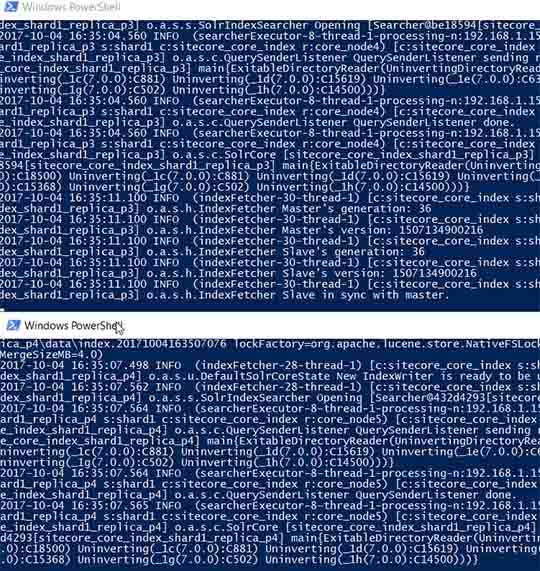
QUESTION: Which nodes get hit for queries from the CD server?
I did a small page that did a simple content search on the web_index. I also stopped any caching towards Solr with:
<setting name="ContentSearch.Solr.EnableHttpCache" value="false" />
Reloading my simple search page multiple times showed that only node 4 and node 5 got hit by the queries.
Now a follow up question would be; what will happen with queries on node 4 and node 5 during an index update?
Since the setup is to preferLocalShard, requests stay on the node getting the query. Without the preferLocalShard, the query would get redirected to the leader if the index wasn’t fully up to date. So an index rebuild will still clear out the index, and for production setups the SwitchOnRebuildSolrSearchIndex must be setup (https://doc.sitecore.net/)
QUESTION: Can we add nodes easily?
Yes. Easy to add a node to Solr, add the replicas needed and finally add the new node to the Load Balancer NGINX. Tested that out with adding a new PULL node, and that worked nice and easy.
WHERE DID THIS LEAVE US?
These couple of blog post set off to test Solr 7’s feature on a new replica PULL. It does seem to be extremely useful and to make scaling easy for both indexing and querying.
A lot of other new features in Solr looks to be extremely useful for Sitecore setups. As mentioned in my previous blog I am going to look into those in the following weeks. But I can’t help noticing this feature:
“Ignoring Commits from Client Applications in SolrCloud” (https://lucene.apache.org/solr/guide)
This feature seems like it was written to handle Sitecore’s hammering at the Analytics Index. Sitecore’s code for updating the indexes triggers of “commits” towards Solr. To avoid having Sitecore control that we can use this feature to ignore Sitecore “commits” and let Solr handle it the way you would normally handle it: Using Solr <autocommit> settings. With this, Solr can do the commits after time or # of documents added/updated etc.
Hope you found the posts interesting and useful.

ROLAND VILLEMOES
CTO